POGO INSTRUCTIONS AND FAQ

WHAT IS POGO
Summary
POGO is a semi automated expert adviser you place on the 30 minute chart when you see the set up on the 4 hour chart is ideal as per the POGO strategy.
Once POGO has been placed on the 30 minute chart, you are free to go about your day. It will wait for the set up to be correct in accordance with the strategy on the 30 minute chart and execute the trade in accordance with the parameters you have pre set.
Should the set up not happen on the 30 minute chart within a 4 hour timeframe – then POGO removes itself automatically with no further involvement from you. Until the next time you see an ideal set up on the 4 hour chart and you place it again.
WHAT POGO DOES
When you see the set up on the 4hr chart in any forex instrument you place POGO onto the 30min chart. It will wait for the right set up in accordance with the strategy on the 30min chart and when the right set up occurs – POGO will place trades.
It is defaulted to take TWO trades as follows –
1) A 1:1 trade with a 30 pip stop loss and a 30 pip take profit
2) A 2:1 trade with a 30 pip stop loss and a 60 pip take profit
NOTE –
Options you have -
1) You can elect for POGO to take only ONE trade by turning OFF the second trade option
2) You can change the pips for the stop loss and take profit to whatever you want.
If after the defaulted 4 hours pass and there is no set up on the 30 minutes, POGO will remove itself completely from your chart and will have no impact whatsoever.
NOTE –
Options you have -
1) You can change the time that POGO remains on your chart when you load it onto your chart. For example, if there is news in 3 hours and you have a trading rule that allows you to only trade up until 2 hours before news – you set the timer for POGO to remain on the chart for 1 hour only – meaning that after 1 hour POGO will remove itself ensuring that your rule is not broken and no trade is placed within 2 hours of news.
2) Alternatively you can set it for longer than 4 hours, for example at night before going to bed you may want to leave POGO the option to take trades within a 6 hour period (as an example) and you simply adjust the settings in accordance – and after 6 hours POGO will remove itself.
Once the set up is present on the 30 minute chart POGO will execute the trades and when the first trade gets to 1:1 (if that is the setting you have left in your inputs when loading POGO) it will close, bank the profit and leave the second trade to run and it will take your stop loss to break even plus a few pips – so it takes any risk you have off the table. You are then comfortable in the knowledge you have banked 1 trade and leaving the second to run with no risk.
NOTE –
Options you have -
1) You can opt for POGO to take on 1 trade and not 2
2) You can opt for the second trade NOT to go to break even when the first trade get to 1:1
When the second trade does one of the following two options (the only two options it can do) –
1) Reaches the take profit
2) Retraces to the break even price
It will close the second trade and then POGO REMOVES ITSELF from your chart and will not take any further trades.
NOTE - It is important that you use a VPS (Virtual Private Server) when trading with Expert Advisers - even semi automated ones.
Why do you need to use a VPS?
The EA will only remain active if the chart you are using it on remains open. If you use it on your computer using your normal wifi you run the risk of it disabling if you have a drop in connection or your screen saver comes on or close your computer for any reason.
With a VPS, your broker account is always connected – and only on extremely rare occasions will there be a drop in connection. Using a VPS makes your trading with expert advisors safer and 100% more reliable option.
I highly recommend using FXVM – I have been using them for over 18 months now and they are really good.
I get great connectivity with them as well as customer support. Below is the link to purchase your VPS, you only need to get the BASIC VPS option. That is the best one.
If you use these guys I will also be able to offer support as well as I also use them and have learned to navigate around the VPS very well.
I do receive a $3 commission as an affiliate with FXVM – however that is not the reason I recommend them, I have been through a few and these guys are good!
The link to purchase your VPS -
Once you can see POGO in your Navigator section it is ready to use.
All you need to do is The Following -
1) to open the chart you want to trade (example EURUSD)
2) Got to the time frame you want the trade to EXECUTE – THIS IS CRITICAL – ALWAYS PLACE POGO ONTO THE CHART YOU WANT YOUR TRADE TO EXECUTE ON
3) Ensure that Auto Trading is clicked (this is along the top of your screen)
4) Drag POGO onto your chart and drop it
A dialogue box will open and you need to do the following –
1) Go to Common and tick Allow Live Trading (this MUST ALWAYS BE TICKED)
2) Go to Inputs and adjust the variables as you wish (this is covered extensively further down under the section – Your Input Options
The 4 hour Set Up
The set up you are looking for on the 4hr chart is as follows –
1) Two cycles with Higher Highs (HH) and Higher Lows (HL) for up trend and Lower Lows (LL) and Lower Highs (LH) for downtrend, as shown in FIG1 and FIG2 below.
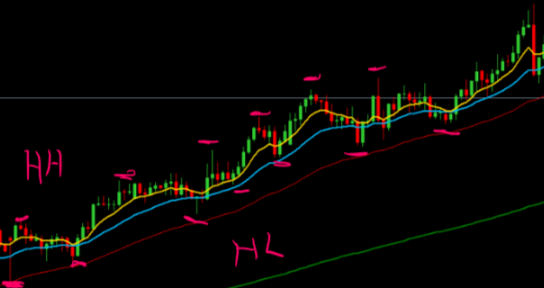
FIG1 an example of price action giving Higher Highs and Higher Lows – when you see two complete cycles and price retrace to the 20 EMA there is a potential set up (4hr chart).
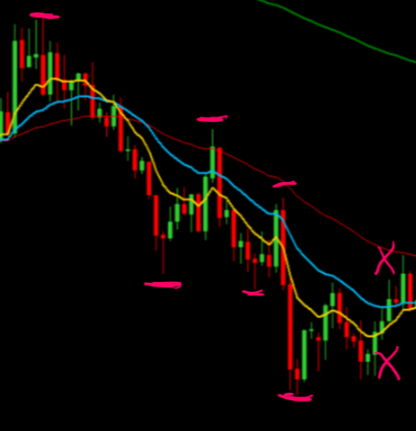
FIG2 – Shows Lower Lows and Lower Highs as well as a break in trend when there is a Higher Low and a Higher High (4hr chart)
In FIG2 above you can see an example of LL and LH in the downtrend. Notice the ‘X’ marks in the image above – where there is now a HL and a HH – which indicates a change in direction.
This indicates a break in trend and any potential set up to be ignored until there is either two cycles in the upward direction or another two cycles continuing downwards.
1) 20 and 50 EMA must be in order (the 20 EMA above the 50 EMA for the uptrend for buys and the 20 EMA below the 50 EMA for the downtrend for the sells.
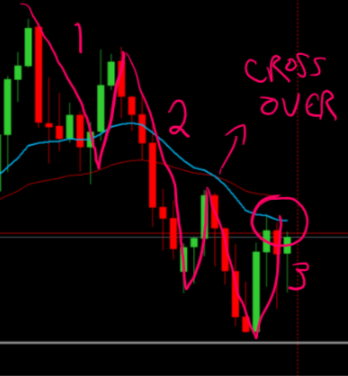
FIG3 shows price action taking three cycles to confirm the 20 and 50 EMA crossover (4hr chart).
You can see from the example in FIG3 above that the crossover only happened after the second cycle, sometimes the 20 and 50 are already in order when there are two cycles
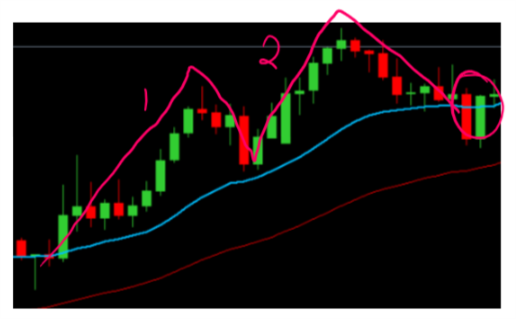
FIG4- the cycles in this image are a continuation of trend – where the two cycles happen when the 20 and 50 EMAs are already in order (4hr chart)
As you can see in FIG4 above 20 and 50 EMA are already in order and there are two cycles and a retrace to the 20 EMA where price interacts with the 20 EMA – this is also a good set up – however a word of caution it is wise to consider and examine how long the trend has been going and if there is a potential change in trend imminent.
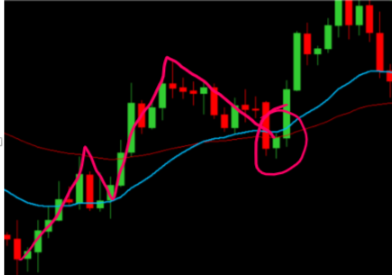
FIG 5 showing two cycles a 20 and 50 EMA crossover and price retracing to the 20EMA
In FIG5 above you can see two cycles and towards the end of the second one the EMAs crossed and soon after price retraced and interacted with the 20 EMA. This is the signal for you to go to the 30 minute chart and place POGO EA on the 30 minute chart
1) When price retraces and interacts with the 20 EMA after two cycles and the EMAs are in order you are now in a position to consider placing POGO on to the 30 minute chart.
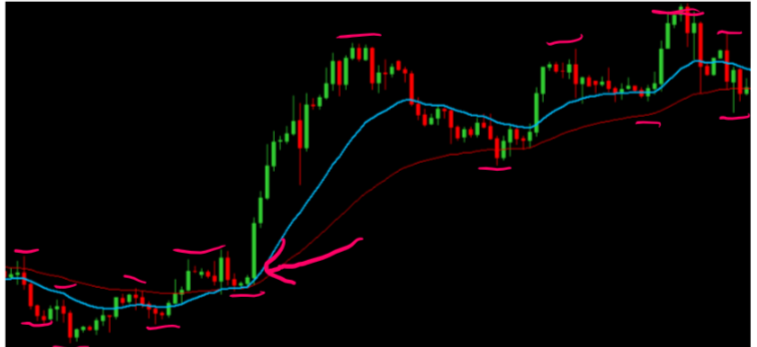
FIG6 This image shows on the left the change in trend from LL and LH to HL and HH confirmed by a 20 and 50 EMA crossover with price interacting with the 20EMA and cycles continuing until LH and LL on the right of the image (4hr chart)
In the image above you can see two cycles, a 20 and 50 EMA crossover and price interacting with the 20 EMA – at this point we consider placing the POGO EA onto the 30 minute chart.
The figure above also shows from the left side a change in trend from downwards to upwards and then another change towards the right of the image from upwards to downwards – all indicated by LL / LH and HH / HL followed by LH and LL
1) When you are satisfied that the instrument has changed trend and is cycling and price has retraced to the 20 EMA all on the 4 hour chart – then open the 30 minute chart and place POGO onto it.
2) For POGO to take the trade on the 30 minute chart the 20 and 50 EMAs need to be in the same order as they are on the 4hr and price needs to retrace to the 20 EMA on the 30 minute for the trade to take Live At Market. See the image below
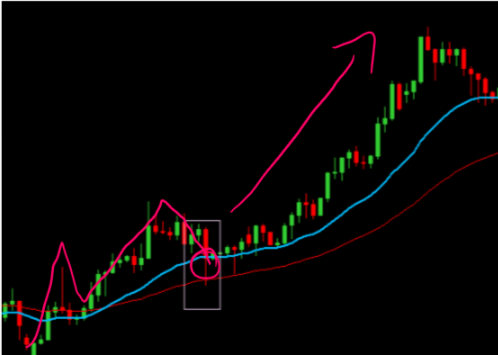
FIG7 shows EURUSD in Dec 17 4 hr chart - Two cycles – crossover of 20 and 50 and price retrace to 20 EMA – the box marks the spot where we place the POGO EA on to the 30 minute chart

FIG8 Image of 30 minute chart with the box (from the 4hr)
In FIG7 above you can see the 4 hour chart showing an up trend, with price action creating two cycles and a 20 and 50 EMA crossover and price retracing to the 20 EMA at that point it is an indication to open the 30 minute chart and place POGO on to it.
The POGO EA will sit on the chart and WAIT!
It will wait for the coded conditions to be in place before executing the trade/s (one or two trades depending on your selection)
POGO Trade ExecutionThese conditions include –
1) 20 and 50 EMAs to be in the same order as the 4hr (the set up of the EMAs on the 4hr will let the EA know if it is a buy or a sell it is looking for. So if the 20 is above the 50 it will be looking for a buy set up and therefor needs the 20 above the 50 on the 30min
2) Once the EMAs are in the right order POGO will wait for price actin to interact with the 20 EMA and only then take the trade
3) It will always get you in at the best possible price as soon as the conditions are met
4) POGO has a default of a 4 hour timeframe in which it remains on your chart – you can change this. If during the timeframe it remains on your chart and there is not set up – it will remove itself completely.
5) Should you wish to leave the default 4 hours that it remains on your chart, then you can check the chart after 4 hours and decide if you are happy to keep POGO on, then simply reload it again (after the set up on the 4hour it can sometimes take a number of hours for the set up to occur on the 30 minute chart)
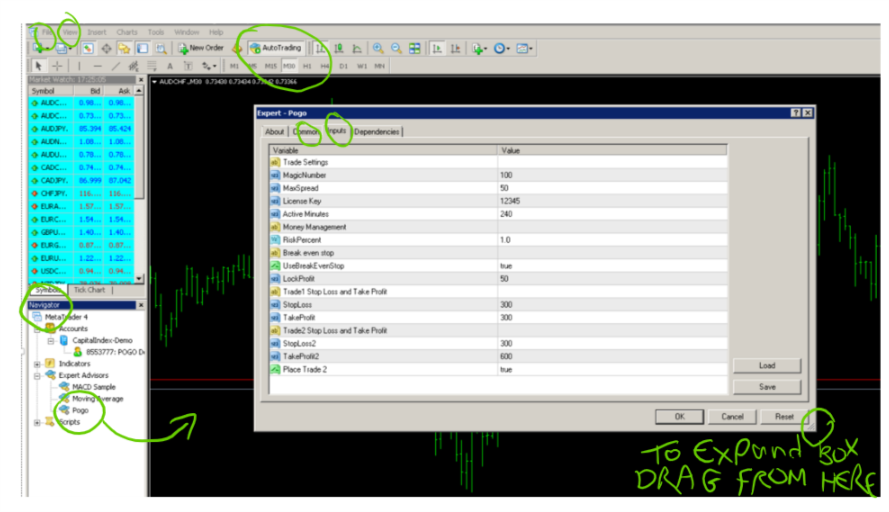
You have the following Input variables –
Magic Number - This the unique number assigned to that chart on that time frame on that instrument – it is important that you do not use the same magic number for the same instrument in the same timeframe if you have more than one trade live. For example, if you have a POGO trade running on the EURUSD 30min that is at break even and moving towards 2:1 or 3:1 etc and decide to open another EURUSD on the 30 minute chart irrespective if it is a POGO trade/strategy – you need to use a different magic number – otherwise the Expert Adviser may get confused and mixed up.
Max Spread - This refers to the broker spread. It is defaulted to 50 points, which is 5 pips. It is recommended not to take POGO trades over 5o points (or 5 pips) – you need to use points and not pips in this section.
License Key – You will have received 2 license keys with your purchase of POGO. These are for 2 live accounts. If you are using POGO on a demo you do not need a license key and you can leave it as the defaulted setting.
Active Minutes – This is defaulted to 240 minutes (4hours) you can change this to how ever many minutes you like.
Risk Percent - Defaulted to 1%. You can change to what you would like it to be up to a maximum of 10% and you can use decimals as well for example 0.1% etc
Use Break Even Stop - This is defaulted to TRUE. You can opt to set this to False. This only is used if you allow POGO to take 2 trades. If you do then when the first trade gets to 1:1 it will close, banking the profits, and move the stop loss of your open trade to break even, taking any risk off the table. You can opt to not use Break Even by clicking on False and this will then result in your first trade closing and stop loss remaining in its original place and allow the second trade to continue.
Lock Profit – This will only operate when you have left the Break Even to True. This is defaulted to 50 points (5 pips). This will move the stop loss beyond your break even point and lock in 5 pips, so should price retrace on your second trade you have a small amount locked in to cover and possible spread or slippage and you will not get ‘reds’ showing.
Trade 1 Stop Loss and Take Profit – this is defaulted to a 1:1 ratio of 300 points (30 pips) take profit to 300 points (30 pips) stop loss – you can adjust this to what you would like
Trade 2 Stop Loss and Take Profit – this is defaulted to a 2:1 ratio of 600 points (30 pips) take profit to 300 points (30 pips) stop loss – you can adjust this to what you would like.
Place Trade 2 – This is defaulted to True, you can elect to set this to false and allow only one trade to take.
Notes -
As mentioned above under the segment ‘Loading Pogo onto your Chart to Use’ it is imperative that you have the Auto Trading button across the top of your screen clicked – if it clicked it will show a small green button on the lower left side of the button.
Also ensure that under the Common Tab in the dialogue box that pops open when you drag the EA on to your chart – the Allow Live Trading box is ticked.
Additional Information
Confluence
As you work with this strategy you will fine tune it in accordance with your edge for example you may look to include some confluence or supporting indicators on the 4hr to confirm your set up decision for example
1) Pivot Points or
2) Fibonacci
3) Currency Strength indicators
4) And many more
It is recommended that whatever tools or decision matrix you use with POGO that you are consistent and use it every single time.
You would be wise to document the process in your trading plan, possibly create a tick list – and only place the trade if you can tick off everything on your list.
If you need assistance with your Trading Plan please contact me on judy@tinyandjudy.com
I have to stress the criticality of consistency in everything you do in trading and one of the significant benefits of POGO and our other semi automated Expert Advisors is that it helps you to stick to rigid rules – you have rules for the 4hr and then the expert advisor sticks to the rules on the lower timeframe.
Further Information and Assistance
As you have purchased POGO make sure you are on our Skype support group and also the POGO Community group.
If you are not, please send me an e-mail to judy@tinyandjudy.com
As always your feedback is always welcome. Any suggestions please sent to me at the above address.
Wishing you phenomenal success in your trading.
Judy van Niekerk
| © 2018 Tiny and Judy Consulting Ltd | DISCLAIMER | PRIVACY POLICY